Getting started
The plugin adds a vehicle search to your store. You build a list of vehicles, link each product to the vehicles it fits, then place the search form wherever shoppers will look for it.

Before you install
This is an add-on for WooCommerce, so install and activate WooCommerce first. Nothing in the plugin will appear until it finds WooCommerce running.
Installing
-
Unzip the download
The file you downloaded from CodeCanyon contains the documentation and the plugin. Unzip it and find the plugin archive inside.
-
Upload the plugin
Go to Plugins › Add New › Upload Plugin and choose the plugin archive. If your host limits upload size, upload the unzipped folder to
wp-content/plugins/over FTP instead. -
Activate
Activate it from the Plugins screen. A VPF menu appears in the sidebar.
-
Load a page to check
Open one page on your shop and one page in the admin. If both load normally, the install is clean.
Where everything lives
Three screens do all the work, and they sit under the VPF menu.
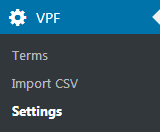
| Screen | What you do there |
|---|---|
| Terms | Add, edit and organise your vehicles: makes, models, years and engines. |
| Import CSV | Load a whole vehicle list from a spreadsheet instead of typing it in. |
| Settings | Every option in one place, split into six tabs. |
Your first hour
-
Add a few vehicles by hand
Go to VPF › Terms and create one make, one model under it, then a year and an engine. Seeing the shape of the hierarchy makes the CSV import much easier to understand later.
-
Link a product
Edit any product, find the VPF Terms box, and add a row for the vehicle you just created.
-
Put the search form on your site
Add the WooCommerce Vehicle Parts Finder widget to your shop sidebar, or drop the shortcode into a page.
-
Search
Pick that vehicle on the front end. Your product should be the result. Once that round trip works, import the rest of your data with confidence.
Building your vehicle list
VPF › Terms
Vehicles are stored as four nested levels. Each level sits inside the one above it, the same way a model belongs to a make.
Audi                 Make
└─ A4                Model
   └─ 2015           Year
      └─ 4.8L V6     Engine
You do not have to use all four levels. A store selling universal accessories might stop at model. A store selling engine components will want all four.

Adding a vehicle
Use the Add New Term form on the left. Give the term a name, then choose its parent. To add the model A4 under Audi, type A4 and set the parent to Audi. To add a year under that model, set the parent to A4.
Finding a term in a long list
Once you have thousands of terms, scrolling is not practical. The Search Terms panel filters by any level, so you can jump straight to the years under one model rather than paging through the whole tree.
Deleting a make also deletes its models, years and engines, and unlinks them from every product. Delete All Terms clears the entire list in one action and cannot be undone. Take a database backup before using it.
Importing from CSV
VPF › Import CSV
The importer builds your vehicle list from a spreadsheet and can link each row to a product at the same time. This is how most stores load their data.

How the file should look
One column per level, plus a column identifying the product. Download the sample file linked on the upload screen and work from that.
Make,Model,Year,Engine,SKU
Audi,A4,2015,4.8L V6,BRK-1180
Audi,A4,2016,4.8L V6,BRK-1180
BMW,M3,2013,2.4L V4,BRK-1180
Writing less by grouping rows
Two shortcuts save a great deal of typing. Both are switched on per column under Settings › Admin.
Comma separated values
List several values in one cell and the importer expands them into separate vehicles.
Make,Model,Year,Engine,SKU
Audi,A4,"2015, 2016, 2017",4.8L V6,BRK-1180
Year ranges
Give a start and end year separated by a dash and the importer fills in everything between.
Make,Model,Year,Engine,SKU
Audi,A4,2004-2008,4.8L V6,BRK-1180Fill every level up to the depth you want. A row with a make and a year but no model imports the make only, and stops there. If you want a make with no models beneath it, leave the remaining columns empty from that point on.
Running the import
-
Upload the file
Choose your CSV. Tick Delete existing terms only if you want to replace your whole vehicle list, and take a backup first.
-
Choose how products are matched
Set Product matching column to SKU or Slug, whichever your file uses. SKU is the usual choice.
-
Map your columns
The importer reads your header row and pairs each column with a level. Headers named Make, Model, Year, Engine and SKU are matched for you. Anything else you set by hand.
-
Import
Progress is shown as it runs. Leave the tab open until it finishes.
-
Read the summary
The final screen reports how many vehicles were created and lists any rows that failed, with the row contents so you can correct them.
The importer works through the file in batches so it does not time out. A file with tens of thousands of rows will take several minutes. Remove blank lines before importing, since they slow the run down.
Linking parts to vehicles
Products › Edit product › VPF Terms
A product shows up in search results when it has been linked to the vehicle the shopper picked. You can do this per product, in bulk, or as part of a CSV import.

On the product edit screen
Click Add in the box header to create a row, then choose the make, model, year and engine. Add one row per vehicle the part fits. Remove a row with the delete control at its end.
If the box does not suit how you work, three layouts are available under Settings › Admin: the row builder shown above, a tree of checkboxes, or the plain WordPress list.
Parts that fit everything
Some products, screen wash or a universal phone mount, fit any vehicle. Tick Universal Product on the product edit screen, or add it to Universal Products in Settings › Admin. Universal products appear in every search result regardless of what the shopper picked.
Editing several products at once
Quick Edit on the products list carries the vehicle fields, so you can adjust a product without opening it. Bulk Edit can set the Universal flag across a selection.
Quick Edit loads your whole vehicle list into the products page. On a store with very many vehicles that can be too much for the browser. Turn off Activate Quick Edit in Settings › Admin and the products list will behave again.
Showing the search form
Three ways to place the form. They produce the same search, so pick whichever fits where you want it.
As a widget
Appearance › Widgets › WooCommerce Vehicle Parts Finder
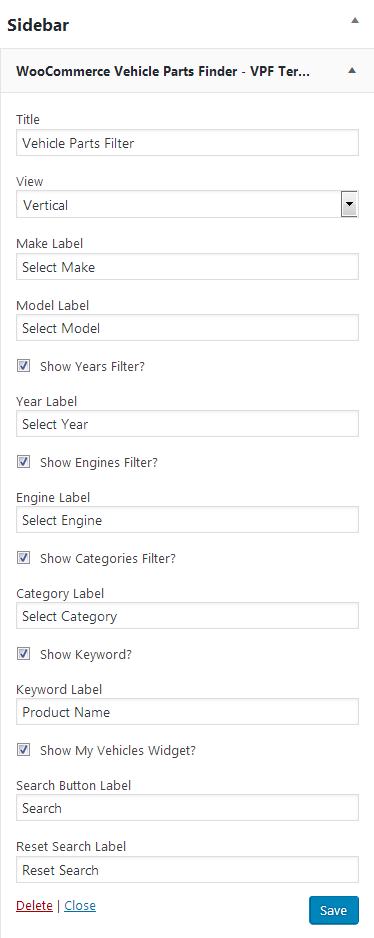
Drop the widget into a sidebar or any widget area. Every label is editable, and each dropdown can be hidden if you do not use that level.

As a shortcode
Use the shortcode to place the form inside a page, a post, or a page builder block.
[woo_vpf_filter view="V" show_year="true" show_engine="true" show_category="false" show_keyword="false" label_search="Search"]
Shortcode options
view- Layout.
Hlays the fields out in a row,Vstacks them. DefaultV. show_year- Show the year dropdown.
trueorfalse. show_engine- Show the engine dropdown.
show_category- Show a product category dropdown, so shoppers can narrow to brake parts for their vehicle rather than everything.
show_keyword- Show a free text field searched alongside the vehicle choice.
show_my_vehicles- Show the saved vehicles panel inside the form.
label_make,label_model,label_year,label_engine,label_category,label_keyword- Placeholder text for each field.
label_search,label_reset_search- Button text.
Friendlier dropdowns
Turn on Activate Chosen in Settings › General and the dropdowns gain a search box. On a list of six hundred models, typing three letters beats scrolling.

Listing a product's vehicles anywhere
This shortcode prints the compatibility table on its own. Used on a product page it picks up the current product, so the id is optional.
[vpf_product_terms_list id="123"]My Garage
WooCommerce › Settings › VPF › My Vehicles
Shoppers who come back for a second part should not have to describe their car again. My Garage remembers the vehicles they searched for and lets them save the ones they own.

Two lists are kept. Saved vehicles are the ones the shopper chose to keep. Vehicle history fills itself from recent searches. Both have a limit you set, and the oldest entry drops off when the limit is reached.
My Garage depends on Remember Search in Settings › General. With that off, the saved vehicles will not apply themselves to the catalogue and the feature will seem to do nothing.
Placing it yourself
The panel appears inside the search form when show_my_vehicles is on. To put it somewhere else in your theme, call it directly.
<?php WOO_VPF_My_Vehicles::get_template(); ?>The product page tab
WooCommerce › Settings › VPF › Custom Tab
A tab on the product page listing every vehicle that part fits. It answers the question shoppers ask before adding to basket, and it gives search engines something to index.

When the list gets long
A part fitting six hundred vehicles makes for a slow page and an unreadable table. Two settings help.
Ajax loads the table after the rest of the page, so the product still appears quickly. Show Year in Ranges collapses consecutive years into a single row, turning twenty rows into one that reads 2001 to 2020.
Settings reference
WooCommerce › Settings › VPF
Every option lives on one screen, divided into six collapsible sections.

General
How the search form behaves.

- Activate Chosen
- Replaces the plain dropdowns with searchable ones. Worth turning on as soon as any list runs past about thirty entries.
- Disable Dependent Fields
-
By default each dropdown stays locked until the one before it is chosen, which keeps shoppers from picking combinations that do not exist.
Turn this on only if you want all fields available at once.
- Show Empty Terms
- Lists vehicles that have no products linked to them yet. Useful while you are still loading data, confusing for shoppers once you are live.
- Remember Search
-
Applies the shopper's vehicle to the whole catalogue, not just the results page. After searching for an Audi A4, the shop page and category pages show only parts that fit it, until they reset the search.
Required by My Garage.
- Disable Redirect Single Search Result
- WooCommerce normally jumps straight to the product when a search returns exactly one. Turn this on to show the results page instead.
- Years Sort Order
- Oldest first or newest first in the year dropdown. Newest first suits most stores, since recent vehicles are searched more often.
Labels
Rename the four levels to match how your trade talks. A motorcycle store might use Brand rather than Make. A machinery dealer might use Series rather than Model. These names appear everywhere on the front end.

- Make, Model, Year, Engine Label
- The name of each level as shoppers see it.
- Category Label
- The name of the product category dropdown.
- Keyword Label
- The name of the free text field.
- Search Results Label
- The text before the vehicle on the results page heading, by default "Search results for:".
Admin
How the plugin behaves inside wp-admin, and how the CSV importer reads your files.

- Activate Quick Edit
-
Shows the vehicle fields in Quick Edit on the products list.
Turn off if the products list is slow or blank on a store with very many vehicles.
- CSV Comma Separated Columns
- Which columns may hold several values in one cell, such as
2015, 2016, 2017. The importer expands each into its own vehicle. - CSV Range Supported Columns
- Which columns accept a range written with a dash, such as
2004-2008. Normally just the year column. - Terms Metabox Template
-
The layout of the vehicle box on the product edit screen.
Custom Meta Box with Ajaxify Rows adds one vehicle at a time through linked dropdowns, and is the easiest on a large list. Tree View shows the hierarchy as nested checkboxes. Default is the plain WordPress list.
- Universal Products
- Products that fit every vehicle and should always appear in results.
- Categories to Include
- Limits the category dropdown to the categories you pick. Leave empty to offer all of them.
My Vehicles
Turns My Garage on and sets every piece of text it displays.

- Activate My Vehicles
-
Switches the feature on.
Needs Remember Search enabled under General.
- Main Title
- Heading above the panel, by default "My Garage:".
- Saved Vehicles: Limit
- How many vehicles a shopper may keep. Saving beyond the limit drops the oldest.
- Saved Vehicles: Title, Description, No Items, Clear History
- The heading, the line beneath it, the message shown when the list is empty, and the text on the clear link.
- Vehicles History: Limit
- How many recent searches are remembered. Same behaviour when the limit is reached.
- Vehicles History: Title, Description, No Items, Clear History
- The same four pieces of text for the history list.
- Add Vehicle Text, Heading, Description
- The link that opens the add vehicle window, and the text inside it.
- Add Vehicle Shortcode
- The search form used inside that window. Takes the same options as the shortcode above, so you can offer a shorter form there than in your sidebar.
Custom tab
The compatibility tab on the product page.

- Activate Tab
- Adds the tab to product pages.
- Ajax
- Loads the table after the page finishes, so a long list does not hold up the product. Turn on if your product pages feel slow.
- Ajax Loading Text
- What shows while the table loads, such as "Loading...".
- Tab Title
- The tab label, such as "Fits these vehicles".
- Tab Heading and Description
- A heading and a line of text above the table.
- Show Engines
- Includes the engine column. Turn off if you do not use that level.
- Show Year in Ranges
- Collapses runs of consecutive years into one row, so twenty rows become a single 2001 to 2020. Worth having on wherever parts fit many model years.
Validation
Decides which fields a shopper must fill before searching, and what they are told when they do not. Requiring make and model, but leaving year and engine optional, is a sensible starting point.
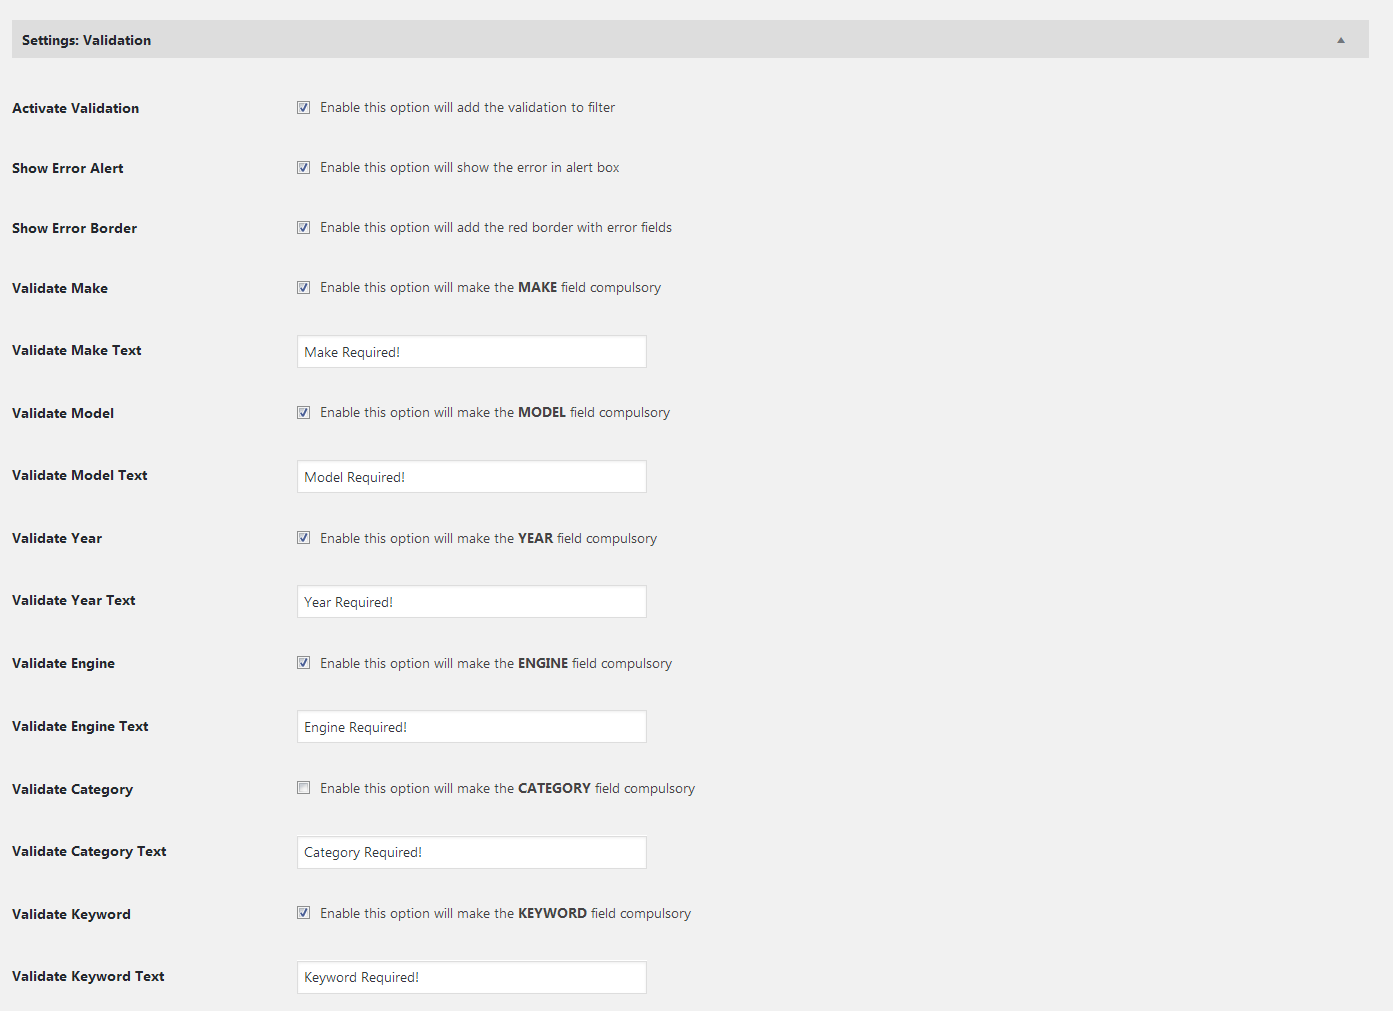
- Activate Validation
- Turns the rules on.
- Show Error Alert
- Shows the message in a browser alert.
- Show Error Border
- Outlines the field that needs attention. Gentler than an alert and usually enough on its own.
- Validate Make, Model, Year, Engine, Category
- Makes that field required, each with its own message.

Troubleshooting
The questions that come up most often, and what to change.
The dropdowns are empty
There are no vehicles yet, or none of them have products linked. Add terms under VPF › Terms, or turn on Show Empty Terms under General while you are still loading data.
A search returns nothing, but the product exists
The product is not linked to that exact vehicle. Open it and check the VPF Terms box. The match is on the full path, so a part linked to Audi A4 2015 will not appear for Audi A4 2016 unless that year is listed too.
The shop page keeps filtering after I searched
That is Remember Search working as intended. Shoppers clear it with the reset button on the form. Turn the setting off under General if you would rather the filter applied only to the results page.
The products list is blank or very slow
Turn off Activate Quick Edit under Admin. It loads your whole vehicle list into that screen, which is too much on a large catalogue.
My import created vehicles at the wrong level
A row is missing a value in a middle column. Fill every level up to the depth you want, and leave the rest of the row empty from that point on.
Deleted vehicles still show on the site
If your host runs a persistent object cache, clear it. The plugin clears its own caches, but a page cache in front of your site may still be serving the old version.
My translations are not appearing
The plugin loads translations from its i18n/languages folder. Your file names must match the plugin's text domain.
Support
Thank you for buying this plugin. Support and updates come directly from the author.
When something is not working, the fastest route to a fix is a message that includes what you expected, what happened instead, and the exact screen you were on. A screenshot of the settings section involved usually saves a round of questions.
- Email: wpinstinct@gmail.com
- Website: wpinstinct.com